Hydrostatic test report and certificate: free template (Excel and PDF)
Deskely Completions team Singapore
A hydrostatic test report records a pressure test from start to finish: what was tested, the checks before the test, the pressure held over time, the result, and how the line was put back afterwards. Signed by the contractor, the client and often a third party, it becomes the pressure test certificate for the test pack.
This page gives you a free hydrotest report and certificate template in Excel and PDF, and explains what each part is for.
- One report per test pack: the lines, isometrics and test conditions at the top.
- Pre-test checks confirm the pack is ready: welding, NDT, supports, blinds, gauges.
- The pressure record shows the test pressure was reached and held for the hold time.
- The test is not finished until the line is drained and reinstated.
What goes in a hydrostatic test report?
- Identification: test pack number, system, line numbers, isometric drawings and P&IDs.
- Test conditions: medium, design pressure, test pressure, hold time, temperature and the code (for example ASME B31.3).
- Instruments: gauge and chart recorder numbers with their calibration due dates.
- Pre-test checks: the test pack is complete and the line is safe to pressurise.
- Pressure record: pressure and temperature at each stage of the test.
- Result and post-test checks: accepted or rejected, then drained, dried where needed and reinstated.
- Sign-off: contractor, client and third party inspector.
The test pressure itself comes from the code. For process piping to ASME B31.3, a hydrostatic test is normally at least 1.5 times the design pressure, corrected for temperature, and held for at least 10 minutes. Use the hydrotest pressure calculator to work it out.
The template
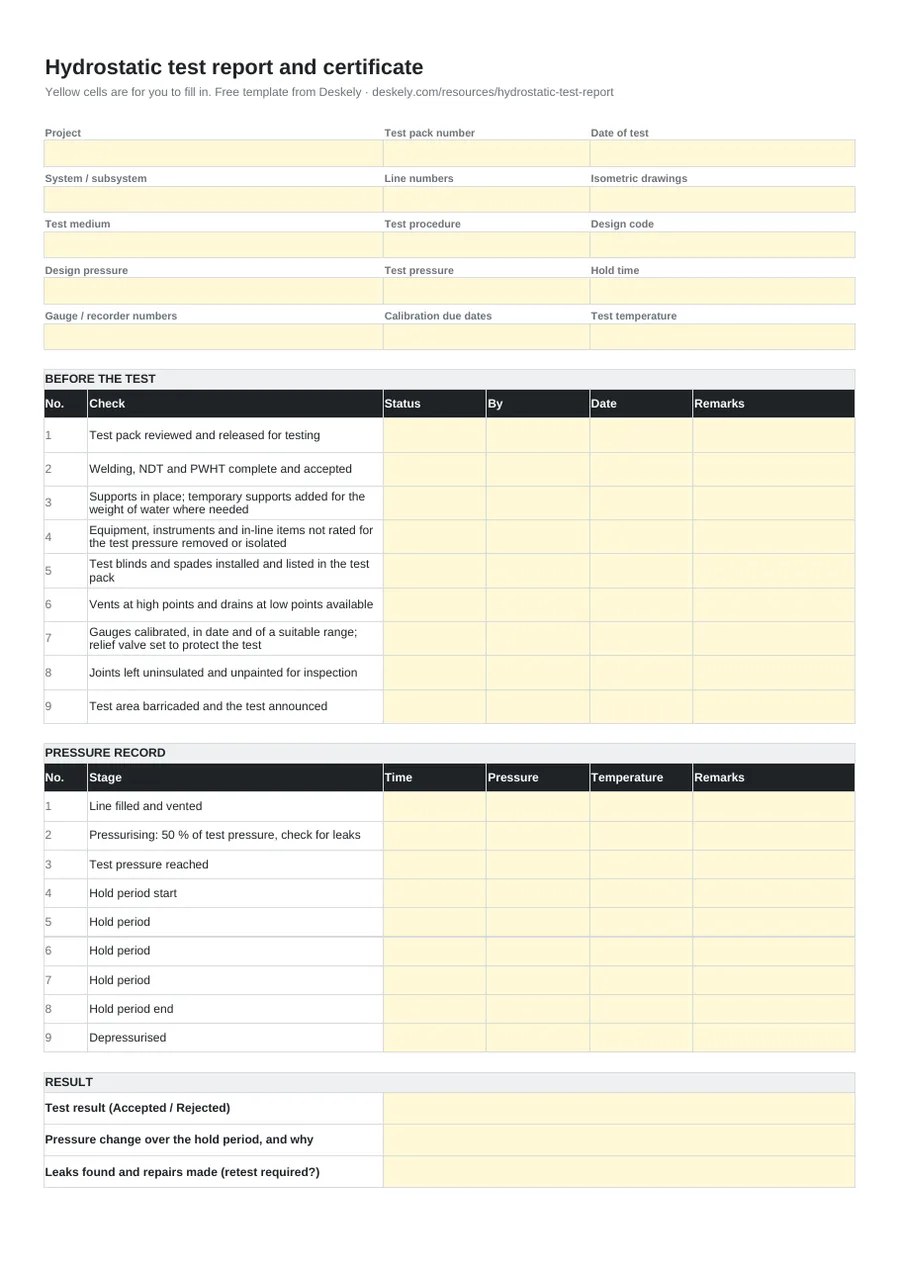
Page one covers the test conditions, the pre-test checks and the pressure record. Page two has the post-test checks and the certificate statement, signed by the three parties.
Before, during and after the test
- 01Review the test pack
Check that welding, NDT and PWHT are complete and accepted, supports are in place, and items not rated for the test pressure are removed or isolated.
- 02Fill and vent
Fill from the low point and vent at the high points, so no air is left in the line.
- 03Pressurise in stages
Raise the pressure gradually, holding at intermediate steps to check for leaks before reaching the test pressure.
- 04Hold and inspect
Hold the test pressure for the required time and inspect every joint. Record pressure and temperature as you go.
- 05Depressurise and reinstate
Release the pressure through the vent, drain fully, remove the test blinds and install the permanent gaskets and bolting.
Test pack records at scale
A large project can have thousands of test packs, each needing its line list, isometrics, punch status and this report. The usual trouble is not the test but the paperwork around it: blinds not reinstated, records missing, packs signed with open punch.
Deskely Testpack builds the packs from the line list and the drawings, records the test in the field and tracks every blind and joint until the pack is closed.
The Deskely products for this
Frequently asked questions
What is a hydrostatic test certificate?
The signed record that a pressure test was carried out and accepted, identifying the lines tested, the test pressure, the hold time and the people who witnessed it.
What is the difference between a hydrotest report and a test pack?
The test pack is the full set of documents for a test: line list, isometrics, P&IDs marked with the test boundary, punch status and the report. The report is the record of the test itself.
How long is a hydrostatic test held?
For ASME B31.3 process piping, at least 10 minutes, and long enough to inspect every joint. Project specifications often ask for longer.
Who signs the pressure test certificate?
Normally the contractor's QC inspector, the client's representative and, where required, a third party inspector.
- In production since 2014
- Thousands of daily users
- On MODEC FPSO projects since 2016